
Order of Chores
• If the macerator works on battery, disconnect and stow the electrical system first to avoid contact with water and with dump
system.
• Disconnect and stow fresh water system second, to avoid contact with dump system.
• Dump and stow dump system last.
Electrical
• Turn off electricity at pole.
• Unplug and stow electrical cords and equipment.
• Close electrical cord mouse hole.
• Don't forget surge protector.
Fresh Water
• Fill fresh water tanks with fresh potable water using the potable water hose and hose filter.
• Location of fresh water tank fill.
• [You may also turn the city tank fill valve (inline, horizontal) to fill the interior fresh water tank #2 -- and the exterior fresh
water
tank #1 if the two tanks are connected (in summer mode). However, be careful not to overfill the tanks and blow the
orange tank
stoppers in the front door and the rear doors.]
• Disconnect city water connection, MP104
• Turn off the external water source.
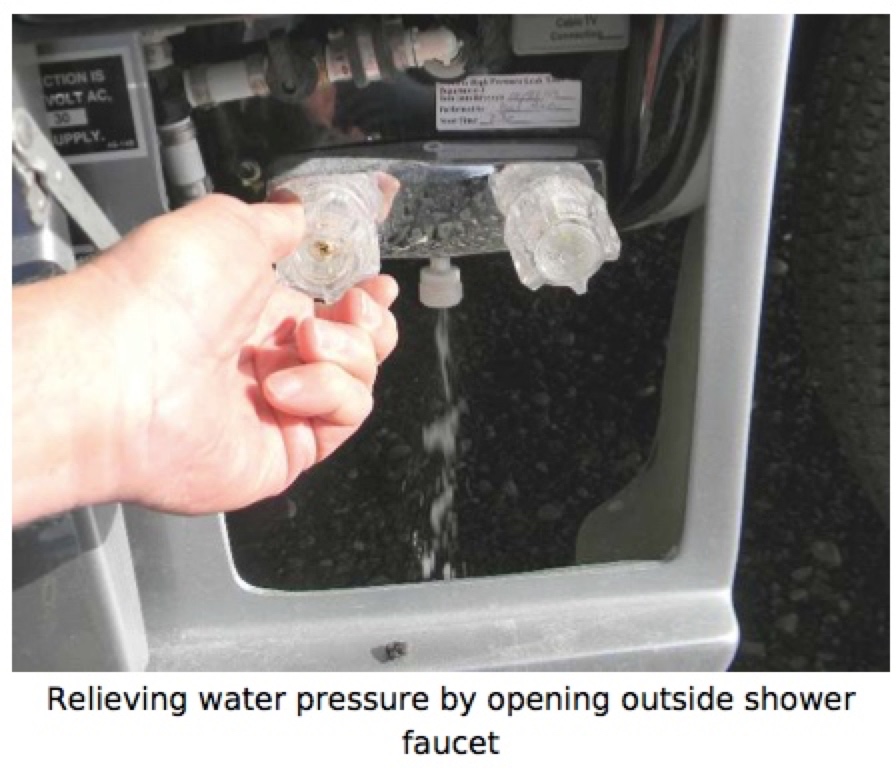
• Open a faucet to relieve the pressure in the system. Failure to do so will not damage your vehicle, but may result
in an unexpected shower when you disconnect the hose. The outside shower faucet next to the city water connection
is a convenient place to do this.
➜ Make sure the the city tank fill valve is closed (handle vertical, perpendicular to line).
• Remove the hose from the RV city water connection, and replace the cap [or plastic bag] on the fill connection.
• Disconnect the hose from the supply faucet and stow it in your storage compartment. Connecting the ends is a handy
way to prevent dirt or other contaminants from entering the hose while stored.
• Disconnect water hoses and water filters and stow.
Dumping Waste Water (Gray and Black) Discharge Pump / Macerator
• [You will need a fresh, but not potable, water hose to clean the dumping equipment, so set the hose up first.
• Open the access door just to the rear of the driver`s side door. This will expose the black and gray water valves. Support the
door in the open position by using the support arm. MP108
• Extend the waste discharge hose, secure the hose in the "dump donut," and secure the donut and hose in the in the
campsite dump hole.
• The discharge stream is forceful and will knock the hose out of the drain if you do not weight it down or secure
it in the drain with the doughnut
• Open the waste discharge hose valve.
• Open the driver’s door and locate the waste water pump switch. It is a red pushbutton located on the driver's seat
base.
• You should dump the black tank first, then the gray tank. The water in the gray tank is considerably cleaner, and will rinse
any remaining solids from the hose and the macerator. You should dump both tanks in sequence if possible.
• Open the black water tank gate valve by pulling the black handle out.
• Press and hold the waste water pump button until the tank is empty. SPURTS
• The waste water pump can be damaged if allowed to operate dry for any length of time.
Turn off the pump as soon as the continuous discharge stream begins to sputter and the
pump's sound changes. MP113
• When tank is empty, pump will get louder with a high pitch sound. Immediately turn pump off, or damage to
impeller and housing will occur. Do not run pump dry for more than 15 – 20 seconds. Flush tank and pump
with water after each use. Macerator Manual
• Living in the Roadtrek - Dumping the Waste Tanks, Meryl and Me Hit the Road; and Me Hit the Road
• so AS SOON as you see the water flow slow down to SPURTS, STOP. If you run the macerator motor
when it is dry you will burn it out!
• ! [Run water through the toilet to flush out the black water tank.]
• ?Close the black water tank valve by pushing in on the handle.
• Living in the Roadtrek - Dumping the Waste Tanks, Meryl and Me Hit the Road; and Me Hit the Road
At the moment we are leaving the black handle open (pulled out) while we are dumping the grey tank
(grey handle pulled out). This is a common suggestion in this process and unless we encounter some problem
after having done this for a year now, we will follow the common trend.
• Open the grey water tank gate valve by pulling the grey handle out.
• Press and hold the waste water pump red button until the grey waste tank is empty.
• [Run water through the sink to flush out the black water tank.]
• Close the gray tank valve by pushing it back in to the original position [and close the black tank value if you have left it open.]
• Close the valve on the end of the waste water hose.
• [Not really needed.] Rinse off the dump area and the waste water hose.
• Return the waste water hose to its storage compartment. Meryl and Me suggest keeping the hose nozzle open. Store the
nozzle facing up.
• Remember when back inside, add about ½ gallon to gallon of fresh water to the black tank. While you`re doing this, add a
packet of black holding tank chemicals to the tank.
Jammed Macerator MP113
• If the wastewater discharge pump stops while you are pushing the button, it's jammed. Something has gotten caught up in
the macerator blades. Release the button to stop the pump.
• Locate the manual macerator crank knob underneath the vehicle.
• Push in on the knob and turn clockwise; you will feel the knob engage the pump shaft.
• Turn the knob first in one direction and then the other to loosen the obstruction.
• Once loose, continue dumping.
Other Outside
• Shut OFF Propane valve at rear of coach.
➜ The propane tank valve operates reverse from the convention; right (clockwise) is open and
left (counterclockwise) is closed. MP120
➜ ➜ [This is incorrect. The propane tank is labeled right closed and left open.
Jimmy, Manager Service Leo's Vacation Center Tuesday, 01 December, 2015]
• Shut OFF city water valve; black plastic handle perpendicular; back, side compartment.
• Check tires.
• Around the generator, check for signs of fuel and exhaust leaks and for damage to the exhaust system. GenManual13
• Collect outside weather thermometer.
• [Stow outside cab door rug.]
• Make final walk around RV inspecting storage compartments, roof and undercarriage.
• [Stow outside cab door rug.]
Inside
• Set refrig to DC driving mode.
• Close fantastic fan and bathroom fan.
• Turn ON Battery Disconnect Switch at Monitor Panel. [to run Refrig on DC power]
• Turn OFF Inverter at Monitor Panel.
• Turn OFF all coach lights.
• Test CO/Gas Alarm and Fire Alarm
• Nest microwave glass turntable.
• Batten down bathroom and storage.
• Log the generator hours. GenManual 13
• Log the milage and time of departure.
• (Test CO and LPG alarm.)